Feeds:
Posts
Comments

Posts Tagged ‘AutoCAD’

Hi Everybody! Just to let you know, we have a great new website and blog for all to enjoy.

The website is amazing, containing information about training, services,  products, support and the latest news about upcoming events and blog posts.  You can even submit a support request online!

The new website is located at http://www.seiler-ds.com

new website


Also, our blog has moved to http://www.seiler-ds.com/blog

We will have a “Sign Me Up” button soon, so you don’t miss a single post!

new blog location

Thank you for following, and have a great day!!!

Julia


Read Full Post »

When using Map 3D 2015, or Map 3D commands within Civil 3D 2015, some dialog boxes are not displayed, despite the fact that FILEDIA AND CMDDIA are set to 1.

This causes their message to be displayed on the command line instead of inside a dialog box.  This is caused by missing Map 3D support folders in the file search path.

To work around this issue, make sure the path to the ade.dcl file is set in the Support File Search Path.

To accomplish this, please follow these steps.

  1. On the command line type OPTIONS.
  2. Go to the Files tab and expand the section Support File Search Path
  3. Add the path : C:\program files\autodesk\autocad 2015\map\support\en-us
  4. Apply, and close the OPTIONS dialog box
  5. You must close and restart Map 3D or Civil 3D for these changes to take affect.

After adding this path to the support file search path, the dialog boxes should work as expected.

Any questions, please reply to this blog, or contact me at jcornelius@seilerinst.com.

Read Full Post »

The new AutoCAD Civil 3D 2015  has improved engineering workflows with tools that help you maintain more reliable data, respond more rapidly to design changes, and the ability to simplify design tasks.  The new features in this civil engineering design software includes:

Corridor Features

  • Frequency of sampling (target and baseline)
  • Sampling improvements
  • The ability to retain corridor targets when substituting a subassembly

Profile Layout Features

  • The ability to extend  curves and tangents to profile extents
  • Using pass through point to create a free curve
  • The ability to change Parameter Constraints on selected curve
  • The ability to Lock profiles/with notifications that alert users if Horizontal Alignment changes impact Vertical Alignments.

Drafting Features

  • The ability to re-associate various Surface and Alignment labels
  • The ability stagger “Corridor Point” section labels

User Interface

  • The software has improved consistency between the AutoCAD Civil 3D and AutoCAD user interface/command set
  • The software has improved graphics, enhanced visual feedback and object selection

Subassembly Composer

The ability to build custom subassemblies more easily. Improvements include:

  • Voids in shapes
  • Axis of Rotation
  • Rail Cant

Geographic Location

Has the new capability to capture and embed Online Map Data (e.g., aerial map information) for offline viewing and plotting

Point Cloud

Point cloud files have improved performance and flexibility.

Interoperability and Data Exchange

  • Export to Keyhole Markup Language (KML)
  • Enhanced export capabilities for DWG and DGN
  • The ability to open and edit AutoCAD Civil 3D 2015 drawings in AutoCAD Civil 3D 2014 and 2013 software

This information was derived from

http://www.autodesk.com/store/autocad-civil-3d/what_s-new

Read Full Post »

If you are installing a new version of Autodesk software on a network, you must download and install the latest version of the Network License Manager to successfully activate your software.

To download the latest version, please click on the link below, which will direct you to Autodesk’s download page.

http://knowledge.autodesk.com/support/autocad/troubleshooting/caas/sfdcarticles/sfdcarticles/Latest-version-of-the-Autodesk-Network-License-Manager.html

Click on the link that matches your operating system and network type of your server, which will start your download.

Please see the list below for the LMTools versions required for network activation for the corresponding version of AutoCAD or other Autodesk products with the same version.

  • AutoCAD 2015 – Version 11.12
  • AutoCAD 2014 – Version 11.11
  • AutoCAD 2013 – Version 11.10.0.3
  • AutoCAD 2012 – Version 11.9.0.0
  • AutoCAD 2011 – Version 11.7.0.0
  • AutoCAD 2010 – Version 11.5
  • AutoCAD 2009 – Version 11.4.100.0
  • AutoCAD 2008 – Version 11.4.0.0
  • AutoCAD 2007 – Version 10.8.0
  • AutoCAD 2006 – Version 10.1.5
  • AutoCAD 2005 – Version 9.2.2
  • AutoCAD 2004 – Version 8.3a
  • ·AutoCAD 2002 – Version 7.1f

Any questions, please reply to this blog, or contact me at jcornelius@seilerinst.com.

Read Full Post »

If you are like most designers or engineers, you have probably worked on projects where cut and fill volumes were required on each cross section, and you were the lucky one chosen who had to sit and calculate all the volumes by hand. The problem is, when you finally finished doing the calculations, you found out the 3D model had changed, and it all needed to be redone, starting over again from the very beginning.  Unfortunately, this usually happened multiple times over the length of the project.  Not only did you have to recalculate the volumes, but you also had to update the volume callouts to match the new numbers.

If this has happened to you, and you are looking for a better solution, I can show you, in just a few easy steps, a way to have Civil 3D calculate the volumes, and insert a table on each section that shows the cut and fill volumes, which will then dynamically update whenever the 3D model is changed.

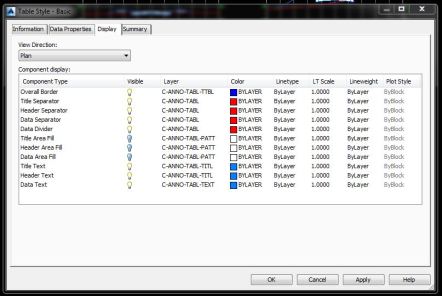
To accomplish this, the first thing that you want to do, is create a section view table, based on how you would like the volumes to show on your cross sections.  This is done by opening the section view module under the settings tab on the toolspace.  Open the node next to table styles, right click on total volume, and choose new.  This will open a dialogue box, allowing you to custom create the table you would like to use for your sections.  Under the information tab, give your style a name and description if you like.  Change the tab to data properties.  Here is where you can pick your text settings, sizes and which volumes you would like to use.  Lastly, go to the display tab, and choose the layers for your new table.  Click on apply and ok, and you are ready to go!

table style  basic data


table style basic display


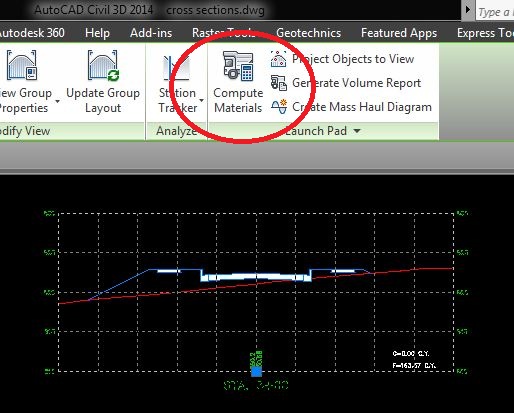
Once your section view table is complete, you may choose the compute material button 1 of 2 different ways, either by clicking on a section view and choose compute material in the launch pad in the ribbon, or switching to the analyze tab, and choose compute material in the volumes and materials panel.  This will bring up a dialogue box that allows you to pick an alignment and sample line group from the drawing.

compute materials 

select sample line group


Once you choose your settings, click ok, and the compute materials list dialogue box opens.  Next, pick your quantity takeoff criteria from the list, and the volume calculation method that you would like to use.  Set the existing and proposed surfaces you would like in the section below.  Once you have the settings completed, it is time for the next step.

edit material list

You are now ready to create your cross sections.  When you choose create multiple section views, you will notice that section view tables is no longer grayed out.  This is because we have already computed the materials list. When you get to this section, please choose total volume for the type of table, and your custom table for the style.  Click the add button on the right.  This area also lets you choose the position where you would like the table to be located based on the section view.

volume table basic

Click on create section views, and they will now have tables attached.

section with basic table


Below is another example of a volume table customized for your standards.

section with table

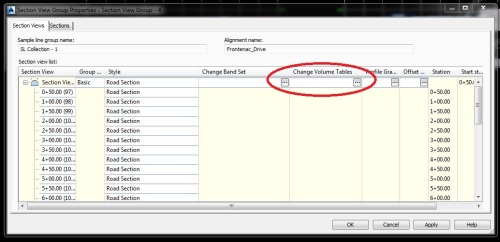
Don’t worry if you forget to add the table when creating the views.  It is easy to add them later if needed.  To accomplish this, highlight an existing section view.   In the ribbon, click on view group properties, and under the section view tab, click on the change volume table ellipse (the small button that looks like a dice).  Choose the table to add to the sections and hit ok. This will also allow you to change the location of the table on existing sections, if needed.

section view group properties

Just by accomplishing these few simple tasks, you will have cut and fill volumes located on each of your cross sections, that will dynamically update if the 3D model changes, and give you more time to devote to other projects.

Any questions, please reply to this blog, or contact me at jcornelius@seilerinst.com.

Read Full Post »

I am currently on-site participating in a Seiler training and I just realized that I’ve never discussed our training here.  We are an Autodesk dealer and have active training centers.  To begin, start by checking out our Public training options:

http://tinyurl.com/seilert

These are just a small percentage of the trainings that we offer. Traditionally, our most popular trainings have been custom trainings where we come to your location and provide trainings of multiple lengths and focus areas for your staff.  While we can do “by the book” trainings, our favorite trainings go outside the book and focus on your needs and questions.  Why? Because your needs and requirements make you unique and give you an edge on your competition. So if you are curious on how we can aid you in achieving your personal, professional and organizational goals, give us a call!


Read Full Post »

Lately I’ve been working with a software called TPC, also known as Trimble Point Creator. TPC was designed for the engineer or building construction contractor utilizing Revit and/or CAD that needs the ability to create 2D and 3D field points within their design software. Working as a plugin within CAD and Revit, Trimble Point Creator provides the creation of field points for such objects as anchor bolt locations, curtain wall attachments, and hanger or sleeve locations.

Image

These points were created in TPC at the intersection of the Column Grids. The creation process was automated and took less than 30 seconds for the entire building. They could also have been created to indicate bolt locations or any other onsite requirements.

Once points are created within TPC, they can be exported to Trimble Field Link for stake-out in the field (Field Link is the software that communicates the CAD/BIM information to the hardware at the construction site). Essentially, this allows a direct communication between the hardware on site and the design documentation that you’ve created in the computer.  So, if you want something built at an exact location, you can input that point into your design software. The individuals in the field will then walk around at the site and be shown electronically the exact location where that item should be installed/constructed.

It’s easy to learn and a good example of a practical application of design data being leveraged directly in the field.

More information can be found here:

http://solutions.seilerinst.com/Catalog/Product/tabid/355/ProdID/321/Default.aspx

and here:

http://www.trimble.com/construction/building-construction/Trimble-Point-Creator-Pro.aspx

Read Full Post »

An existing program which has been given new life is Autodesk Vault. Vault is a file management tool that has been given improved integration in the 2013 products. Here is an image of how Vault has been integrated into AutoCAD, but it has been integrated into the majority of Autodesk products (including Revit).

The purpose of Vault is file & version management, and to a certain degree, quality control. By using Vault you can:

1. Control your project revision history as Vault can store previous (older) documents in the organizational structure of your choosing.

2. Allows an individual to “Check Out” documents, but perhaps more valuable, you can restrict who has the ability to check out documents. To put this in plain English: you can restrict who can view files as well as who can modify files (read only mode), ranging from DWG files to Excel spreadsheets.

3. It integrates with MS Word and Excel so that project files/documents can be stored and organized without other file management solutions.

4. Items such as AutoCAD blocks and Revit families can be arranged in “quality controlled” product libraries and released to the user base when approved by the administrator.

5. Can work in conjunction with Buzzsaw to share files with team members in other offices/job sites. This means your “Vault” of drawings and documents can then be read (and sometimes revised, based on your security settings) on handheld devices such as iPads and Smartphones.

Here is a link with more information on Vault and some of its applications: http://usa.autodesk.com/adsk/servlet/pc/item?siteID=123112&id=18697727

So may it be capturing project milestones or used as an integrated quality control & file management system for Office and CAD/BIM files, Vault is making headway into our AEC (Architecture, Engineering and Construction) workflow.

Read Full Post »

An interesting new product Autodesk would like you to test is called BIM Coordinator, it allows for an easy workflow of sharing coordinates between Civil 3D and Revit.  It is currently available at Autodesk Labs.

An introduction for those not familiar Labs:  

Autodesk labs is the traditional testing grounds for new technologies from Autodesk.  The technologies regularly become new products or are incorporated into existing products as new features.

Link to software:  http://labs.autodesk.com/utilities/bim_coordinator/

A video overview of the technology produced by Autodesk can be found here: http://www.youtube.com/watch?v=aSxbv7QPero

So, if you work on projects where data needs to be shared between Civil 3D and Revit, this technology is definitely worth a look!

Read Full Post »

AutoCAD 2013

AutoCAD 2013

The new Autodesk products have begun to become available on Autodesk Subscription Center. Over the next few weeks more products will be rolled out, just keep your eyes open on Subscription Center for your downloads / software to become available.

If you are not familiar with subscription center, downloading your software, etc. you can learn more about it on this PDF.

Good luck and contact us with any questions!

Read Full Post »

Older Posts »